
In the last post we learned that in DAX every sub-formula always runs with two lists in place: a list of all the values of the current row (“Row Context”) and a list of all the current filters (“Filter Context”). These two lists together are called the sub-formula’s “Evaluation Context”.
These lists exist so that if the sub-formula needs to retrieve one or more values from the current row it can pull them from the first list (“Row Context”) and if the sub-formula needs to do something that involves applying filters automatically, it can look at the second list (“Filter Context”) to know exactly which filters to apply.
We also learned that when an Iterator wants to run a Per Row Formula (a type of sub-formula) for each row of a Temp Table, what it does mechanically is create a new Evaluation Context (pair of lists) for *each row* where it effectively “writes down” the values of that row into the Row Context. This is then where the Per Row Formula goes to grab values of each row.
This probably seems overly complicated. But keep in mind, it’s not a human working with this data, it’s a computer. And to a computer, this way of dealing with things makes lots and lots of sense.
So having discussed the Per Row Formula and how it relates to Evaluation Context, in this post we can now move on to the New Filters Formula and better understand how *it* works with Evaluation Context.
Thankfully, this will be a little easier to deal with.
The New Filters Formula and CALCULATE
We’re going to work through an example we worked through two posts back. Here’s the same old Data Model that’s served us so well:

OK, let’s look at the Measure we’re going to use in this post:
Total Transactions All Shifts =
CALCULATE(
    COUNTROWS( Sale ),
    REMOVEFILTER( Sale[Shift] )
)
The idea with this Measure is that it should tell us how many sales transactions occurred (how many sales rows where there), but it should look at *all shifts*. If a user has sliced down to just one shift, the Measure should ignore this and still look at both shifts (that’s what the name of the Measure implies).
To achieve this behavior we are using the CALCULATE function, and we’re giving it two arguments:
Argument 1 – The New Filters Formula
Argument 2 – The Filter Modification
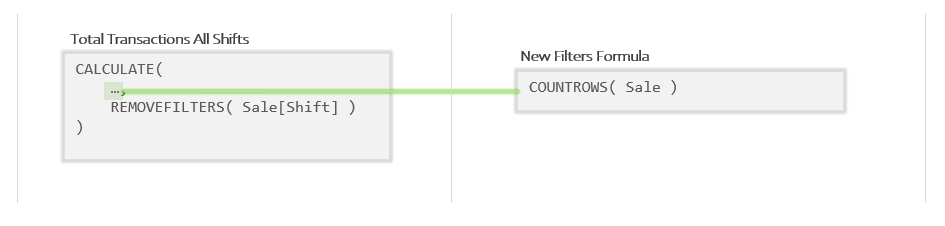
Let’s pull out just the New Filters Formula (argument 1) so we can look at it in isolation:
COUNTROWS( Sale )
That is the New Filters Formula we’re giving to CALCULATE. It is the sub-formula CALCULATE will run within a new set of filters. The change to the filters is determined by Argument 2:
REMOVEFILTERS( Sale[Shift] )
Here we are telling CALCULATE to remove any filter on “Sale[Shift]”. That is our Filter Modification.
The above description is pretty good, but let’s rephrase it a little so that we’re incorporating the ideas of Evaluation Context:
CALCULATE is going to create a new Evaluation Context (pair of lists), and then run the New Filters Formula within it. The new “list of values of the current row” (Row Context) won’t change any; the new list will be the same as the old list. However, the new “list of the current filters” (Filter Context) will be different than the old list in that any filter on “Sale[Shift]” will have been removed.
Once this new Evaluation Context is built, CALCULATE will run the New Filters Formula within it. This is how we achieve the effect of running the New Filters Formula with all filters on “Sale[Shift]” having been removed.
If your head is spinning a little here, don’t worry too much. In the next section we will work through this with illustrations which will help a lot.
(At this point you may be asking why my first example of CALCULATE involves removing a filter rather than adding a filter. It is true that you will spend more of your time adding filters with CALCULATE than you will removing them; however removing filters is both pretty important to know how to do, and is conceptually much more straightforward than adding them. This will let us focus on the essentials of how CALCULATE works with Evaluation Contexts without having other concepts muddle things up. Don’t worry, adding filters is a topic that we will be covering soon.)
A Decompose By Any Other Name
OK, so let’s imagine this Measure on a Power BI card visual with some slicers nearby:

Notice like last time, the user has sliced down to “Lunch” and “H. Special”; that will (again) come into play in very soon.
OK, great. Now let’s imagine the Measure floating in its own little box:

Now let’s decompose the Measure by pulling the New Filters Formula out into its own separate box so we can think of it rightly as a sub-formula:
So above we can see the main formula in the left panel and the New Filters Formula broken out into the right panel. (To describe the relationship between the two, we call the main formula the “parent formula” and the New Filters Formulas the “sub-formula”.)
Remember those slicers the user clicked on? Let’s add those to our illustration by adding the Measure’s initial Evaluation Context:

So when this Measure starts running, the initial Evaluation Context looks just like it did in the last post. Since the Measure isn’t running “in a row”, the Row Context is empty. Because the user has sliced down to “Lunch” and “H. Special” the Filter Context contains those two filters.
Great, now let’s imagine out Measure starting to run.
Our Measure is pretty simple: CALCULATE is going to create a new Evaluation Context for the New Filters Formula (argument 1) to run within. How will the new Evaluation Context be different? Any filter on the “Sale[Shift]” column will be removed (argument 2).
So CALCULATE copies the Evaluation Context from the left panel, removes the filter for “Lunch” (because it is on “Sale[Shift]”, the column we said to get rid of filters on) and then “slips the new Evaluation Context under the wall” so the New Filters Formula can use it.
Let’s add that new Evaluation Context at the bottom of the right panel:
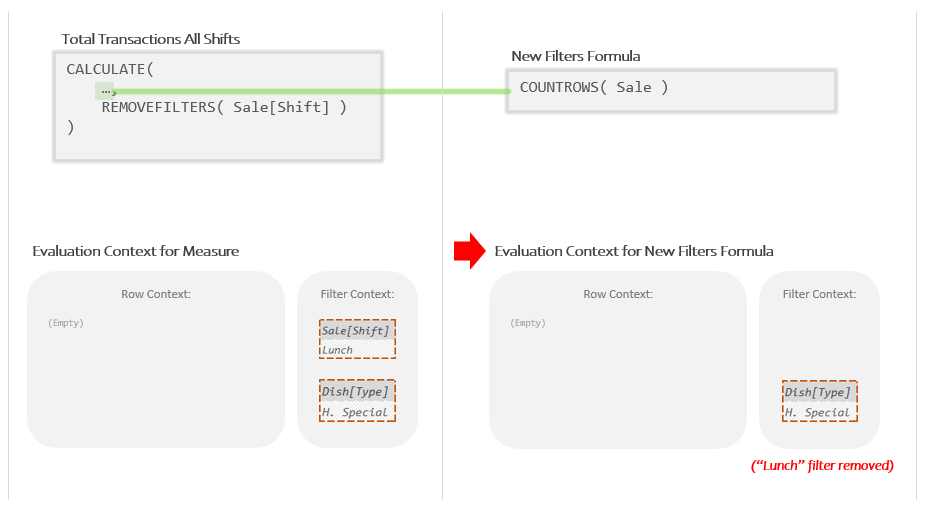
So *that’s* the new Evaluation Context that the New Filters Formula will run within. How is it different from one one the left? The filter for “Lunch” on the “Sale[Shift]” column has been removed.
So now that we can see both the New Filters Formula and the Evaluation Context it will run in, let’s actually imagine the New Filters Formula running. What was the New Filters Formula again? Oh right:
COUNTROWS( Sale )
COUNTROWS is expecting a Temp Table and we’ve given it a Model Table; DAX does the conversion for us by taking the Auto Snapshot of “Sale”. (More on that here)
The Auto Snapshot makes a copy of “Sale”, adds all Related Columns, and then performs Auto Filtering. In this last step, all filters from the *current* Filter Context get applied. Keep in mind the current Filter Context is the one on the right where the “Lunch” filter has been removed.
Let’s look at the Temp Table that the Auto Snapshot produces:

We can see the Temp Table in the top right corner. Notice that it has been filtered down to “H. Special” (column #6), but it has *not* been filtered down to “Lunch” (column #1).
Because the Auto Snapshot occurs within the *new* Evaluation Context (right panel), it produces a different Temp Table than it would have if performed in the initial Evaluation Context (left panel).
So what does COUNTROWS do with this Temp Table? It, well, it counts how many rows it has. Which is 3. Which is also our final answer:

That, at it’s simplest, is how CALCULATE works to create a new Evaluation Context with a modified list of filters (Filter Context) to run a New Filters Formula within.
Here’s that last image again. Take a moment to see if you note see how all the pieces work together to create the outcome we wanted:

It’s That Easy
Conceptually, CALCULATE is not difficult once you know how to think about it. You want to do something, but the filters that are currently active will cause the outcome to be incorrect. CALCULATE let’s you change those filters, then do the thing you want to do with the *right filters in place* so that you get the correct answer that you want.
That said, there are some big obstacles to getting good at working with it.
The first obstacle you need to overcome is understanding that what you are giving to CALCULATE in argument 1 is a sub-formula, not a number. Argument 1 contains the instructions for what you would like CALCULATE to do once the filters have been changed; it runs only *after* the filters have had some changes made to them. Said otherwise, you have to think of it as a sub-formula. (Excel has no such concept and this can be tricky to wrap your head around.)
The second obstacle is developing a more mechanical understanding of how DAX keeps track of “the filters” so you can understand what it is that CALCULATE is actually changing when it “changes the filters”. This, of course, means understanding Evaluation Context. This is the thing that DAX changes when it “modifies the filters”. It’s best to understand Evaluation Context as neither ephemeral nor highly abstract; it’s a simple pair of simple lists; nothing more. CALCULATE makes a copy of the existing pair of lists, makes some changes to the list that keeps track of filters (Filter Context) then runs argument 1 (the New Filters Formula) with the new lists in place.
Once you understand this at a tactile level, your last obstacle is getting good at keeping track of both lists (Evaluation Context) in your head. Absolute mastery in this can take years; but basic proficiency can be achieved pretty fast when you start with a crisp, clear understanding of what it is you are supposed to be keeping track of. I hope at this point, when I ask you to imagine Evaluation Context in your head, you are at least starting to get a sense of what each of the lists *looks* like, which is a great first step.
We’re not quite done with this topic tough. Now that we’ve walked through how our Measure worked, I want to dive just a little bit deeper into *how* changing the Filter Context got us the number we wanted. Being very specific here will help with other things later on.
For that we’ll have to unpack the Auto Snapshot process. That’s the topic of my next post.
I look forward to see you there!
-BG
