
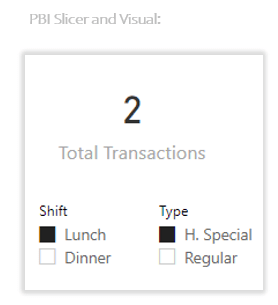
In the last post we learned that when you see the name of a Model Table in your code the mental picture you draw in your head of that thing is probably incorrect. So in the following code:
Total Transactions = COUNTROWS( Sale )
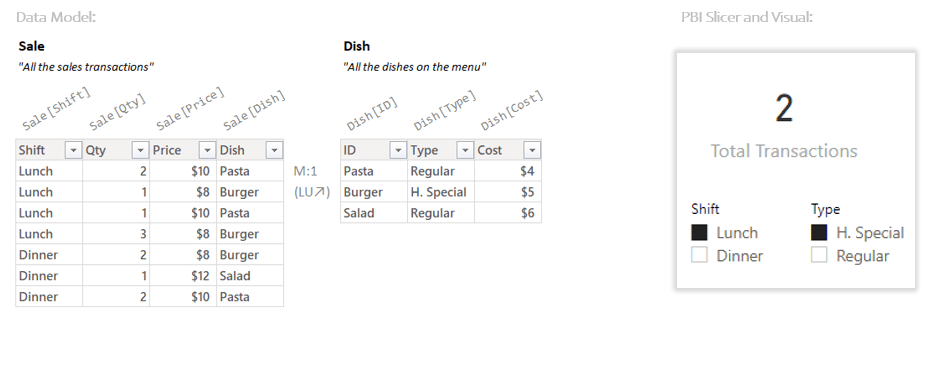
The reference to “Sale” will make you want to envision the Sale table that you loaded into your Data Model:

But what actually gets sent to the COUNTROWS function is going to look different. Usually there will be more columns, fewer rows, and you should probably draw it in your head a little differently because it’s a different *kind* of table (Temp Table vs Model Table).

While at first glance this is baffling, we also learned that if DAX didn’t do this, writing a very simple measure would be a ton of work. Since DAX is designed to be a self service language for non programmers, it automates certain things to make simple code easier to write. This is one of those things.
In this post we’re going to see how those automatic steps actually work to produce the result that and end user expects.
DAX (Still) Makes It “Just Work”
Rather than requiring all that code to do something simple, DAX let’s you type in just a small bit of code, and does the fancy complicated work behind the scenes without telling you to make sure the right answer shows up in your reports.
Let’s remember our Data Model and Power BI visuals/slicers:
Let’s imagine out code again:
Total Transactions = COUNTROWS( Sale )
The COUNTROWS function is expecting a Temp Table, and we just gave it the name of a table in our Data Model (a “Model Table”). To make our life easier DAX is not only going to do the conversion, it will also do a few other bits for free.
Here again are my name for three automatic things that happen:
(the more technical names are in parenthesis)
The Simple Copy
The Super Lookup (Table Expansion)
Auto Filtering (Natural Semi Joining)
So, one step at a time, let’s see what happens when a function that is expecting a Temp Table (COUNTROWS) is instead given the name of a table in our Data Model (Sale).
Step 1: The Simple Copy
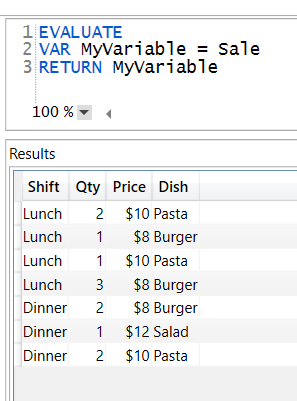
The Simple Copy, is, well, it’s a simple copy. The Sale table in the Data Model has an exact copy made of it in the form of a Temp Table.
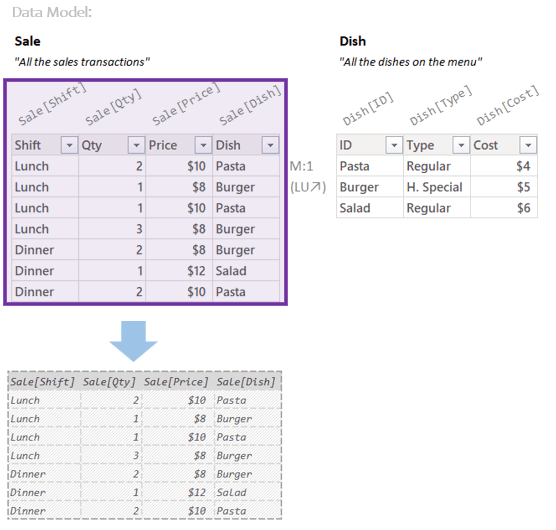
Yep, that’s a copy.
Because it’s a Temp Table, the column names are the longer style (“Sale[Shift]” vs just “Shift”) which is just how Temp Tables do things. But otherwise it’s an exact copy.
Now DAX would *like* to filter this new table we made, but there’s something it has to do first.
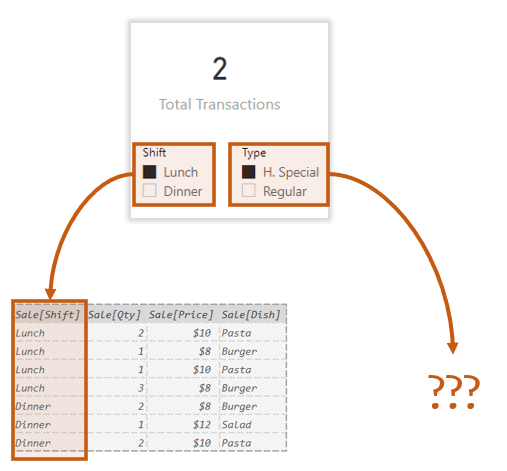
For any filters just on columns of the Sale table, this copy would work fine. That means our filter for “Lunch” works fine.
But our filter for “H. Special” is on a column of the Dish table; our Temp Table doesn’t have any columns for that filter to grab onto:
Luckily DAX has a solution for this.
Step 2: The Super Lookup
This is where the Super Lookup comes in. Much like how in Excel VLOOKUP handles most problems, in DAX the Super Lookup handles most filtering problems.
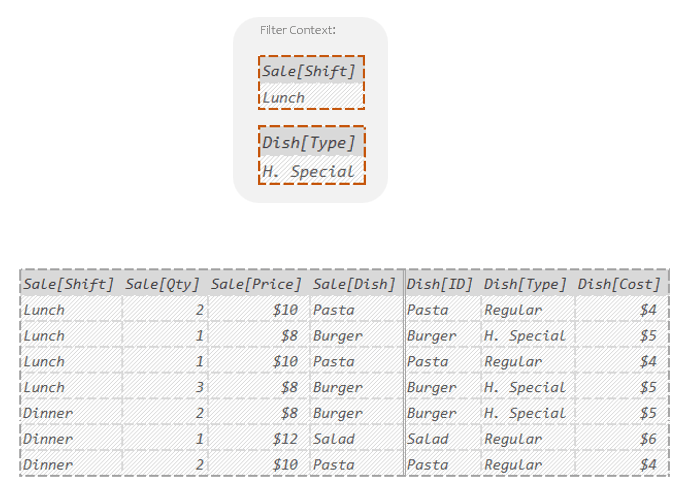
The way it works is that DAX uses the relationships between tables to essentially lookup *every* column it can from any other table in the Data Model. In our example, the Super Lookup uses the relationship between Sale and Dish to lookup all the columns from Dish:

All three columns get brought in. If, to give a more complicated example, our Sale table was related to 6 different tables with 10 columns each, the Super Lookup would bring in all 60 columns.
(With this behavior, it’s almost as if the Temp Table inflates like a balloon, expanding outwards to the right. This is where the more fancy term for this of Table Expansion comes from. For new users though, especially Excel users, I think calling it “The Super Lookup” is easier to remember and understand. It’s a really powerful lookup. That’s all. Note that because of the smart way data is stored in DAX this all this looking up is almost instantaneous, this is not slow like it would be in Excel.)
Notice two things about our Temp Table here:
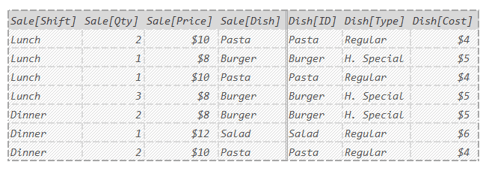
Because Temp Table column names are the longer style (“Sale[Shift]” vs just “Shift”) we can look at the columns here and know exactly which table in the Data Model they came from. That will come in handy in a minute.
Also, there’s a little separator between the columns from Sale and the columns from Dish. That’s because any columns that get brought in through the Super Lookup are always considered Related Columns. These get some special treatment in a few small places in DAX (the RELATED function being the most obvious) so I draw the little separator there to differentiate them.
OK, those ideas are important, but let’s get back to the the task at hand.
Now that the Super Lookup has happened, our Temp Table has all the columns in needs to properly let the filters from our slicers do their filtering thing:

What was that third step again?
Step 3: Auto Filtering
Auto Filtering is, you guessed it, filtering that happens automatically.
In DAX clicking on things like slicers will add filters to something called the Filter Context. The Filter Context is nothing more than a list of all the filters that get applied during Auto Filtering. What’s weird for new users though, is that these filters come in the form of Temp Tables.
So thinking about the slicers our user has selected in our example:
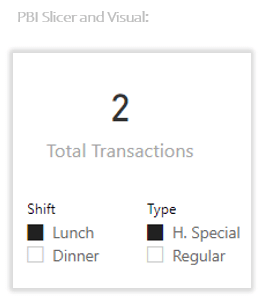
We can imagine the Filter Context in our example looks like like this:
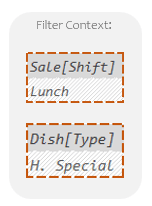
Just boring old Temp Tables hanging out together, one per slicer. They are filters though, make no mistake.
In English I would describe the top Temp Table as:
“A filter for Sale[Shift] equals Lunch.”
In English I would describe the bottom Temp Table as:
“A filter for Dish[Type] equals H. Special”.
So to be very clear, in DAX, every filter in the Filter Context is really just a Temp Table. I drew the borders orange to help remind me they are “filters”, but otherwise they are no different than any Temp Tables we will ever encounter. They are not special kinds of Temp Tables, they are just regular Temp Tables that have been flagged to act as filters.
Are there filters that aren’t Temp Tables? No.
Am I sure? Yes.
In the world of DAX, when someone says “a filter” they mean one of these Temp Tables.
Lots of things can put Temp Tables in the Filter Context (turning them into “filters”), but the easiest to think about is slicers. So when the user slices to “Lunch” and “H. Special”, those slicers *put* the filters into the Filter Context:

OK. So let’s imagine the Temp Table from the Super Lookup, and think about our Filter Context floating over the top of it:
(It very much resembles the alien spaceships in Independence Day, doesn’t it? That’s appropriate for what’s about to happen.)
So with all that setup, let’s watch what Auto Filtering in action:

The filter for “Lunch” on Sale[Shift] looks at the target table to see if there is any column also named Sale[Shift]. Yep, the first column. So in that first column the filter knocks out any rows where the value is something other than “Lunch”.
The filter for “H. Special” on Dish[Type] looks at the target table to see if there is any column also named Dish[Type]. Yep, the sixth column. So in that sixth column the filter knocks out any rows where the value is something other than “H. Special”.
Said differently: DAX only kept the rows where Sale[Shift] was “Lunch” and Dish[Type] was “H. Special”.
(The fancy term for this “table based filtering” is Semi Joining. There is no need to memorize the fancier term, but if you see it written some where, this is what they are talking about.)
The only rows that made it through both filters were the second and fourth row. Those two rows are what come out the other side as our final Temp Table:

That Temp Table is the final result we get. This the end result of The Simple Copy, The Super Lookup, and Auto Filtering.
That Temp Table is what gets passed into COUNTROWS:
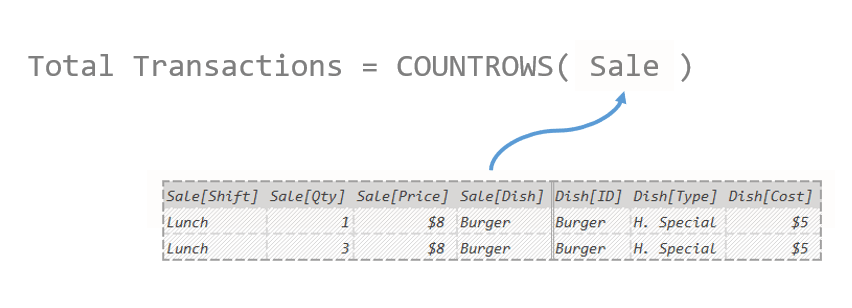
And when COUNTROWS counts the rows, it comes up with 2. Our final answer:
Before we totally declare victory, let’s rewind a second to look again at the Auto Filtering:

It’s very important to note that the only reason that the filter for “H. Special” was able to work is because of the extra columns that the Super Lookup added. If those columns weren’t added the target table would have had no column called Dish[Type] to filter on and the filter would have done nothing. While the columns added by the Super Lookup can be used for several things, it’s this Auto Filtering that is the most important.
Let me say that again: the Super Lookup happens so that Auto Filtering will have all the right columns to filter on. If instead of a single lookup table like we have, we imagined a bigger Data Model where our Sale table also had lookup tables for Customer, Date, and Store; the Super Lookup is what ensures that any slicers on any columns from those other lookup tables get applied as expected. The Super Lookup (fancy name “Table Expansion”) is the bit of magic that allows filters from different tables to work in a way that *feels* correct to the end user, even if they have no idea how it works.
(Before I get emails about it, for the advanced folks: I said the filters are looking for common column names between themselves and the target table to figure out which columns to filter on. Each column in a Temp Table has something called a Lineage Tag, which is like an internal name for the column; these allow the columns to be very officially tied back to the column they came from in the Data Model (which also have Lineage Tags). The matching of columns for filtering is technically done through these Lineage Tags instead of the just the column names. However, thinking about this matching happening on full column names is much easier and outside of very extreme edge cases you would never encounter in practice, you get the exact same result. This is how I think of it in day to day use, and I recommend the same for new users.)
Review: A Temp Table in Three Easy Steps
We covered a lot; thankfully, most of it wasn’t super technical. Let’s review the Auto Snapshot process.
When a function is expecting a Temp Table, and we instead give it the name of a table in our Data Model (a “Model Table”), DAX does 3 things for us:
The Simple Copy makes a simple copy of the Model Table as a Temp Table.
The Super Lookup uses the relationship between the Model Table and any related Model Tables and “looks up” all the columns of those related tables.
Auto Filtering takes all the filters in the Filter Context and applies them one by one to create a “filtered” Temp Table.
Here’s our example where we took the Auto Snapshot of the “Sale” Model Table with slicers set to “Lunch” and “H. Special”:

The resulting 2 row, 7 column Temp Table at the bottom is what got handed to COUNTROWS.
At this point you might be wondering:
“OK, this is what happens when a function is expecting a Temp Table and we give it a Model Table; but what about functions that are actually expecting a Model Table (not a Temp Table)?”
The short answer is that very few functions are actually expecting a Model Table; they almost all want Temp Tables. Therefore when you see the name of a Model Table written out in code, 95% of the time the Auto Snapshot is happening. The few places where this isn’t true, the function’s behavior is fairly intuitive so you don’t need to worry too much about these exceptions.
Fine, but how do you spot the functions that actually want Model Tables?
For common usage there are only two functions that are actually expecting Model Tables rather than Temp Table: ALL and REMOVEFILTERS.
So, for example, if you see either of the following:
ALL( Sale )
REMOVEFILTERS( Sale )
The reference to “Sale” does not trigger an Auto Snapshot, because those functions don’t want a Temp Table, they actually want a Model Table. Since you’re giving the function the kind of table it wants, no conversion is needed.
Do you need to memorize these exceptions? No. Not yet at least. You certainly *can* if you want, but since the majority of functions want Temp Tables rather than Model Tables it’s generally better to start by just treating every table reference like an Auto Snapshot.
That is to say, for new folks, whenever you see the name of a table in your Data Model written out in code, just assume that what you are looking at is an Auto Snapshot. And in that code, where you see that name of the table written out you should say “that’s an Auto Snapshot” and try to imagine as best you can the copy being made, columns being added, the filters being applied, and the Temp Table that comes out the other side.
(The last post in this series will be about helping you actually do that.)
Once you can do this reflexively, then you can worry about trying to spot (and understand) the occasional exceptions. That second part is much easier.
Why Is It Worth the Effort Though?
As I’ve said before, DAX is a language of tables, you have to be able to keep track of the tables in your head in order to keep track of what your code is doing. That means at least to some degree, seeing the tables in your head. If you start by seeing the wrong tables, then trying to *correctly* make sense of what DAX is doing next will be impossible. If you start by seeing the right tables, the rest of the code will feel much more logical and simple.
If that’s not enough for you, consider the following:
If you can understand the Auto Snapshot, then you understand both the Super Lookup and Auto Filtering. Those two together are how filtering works *mechanically* in DAX. That means in learning the Auto Snapshot, you’ve also learned how filters actually work in DAX. Not just an intuition of what results they produce, you understand the actual steps involved.
Filters and Auto Filtering are so central to DAX, that I think it’s impossible to understand DAX with first understanding these. It’d be like trying to be a car mechanic without understanding the basics of how a combustion engine works. Until you understand these, DAX will continue to be confusing. The Auto Snapshot is a great place to start.
You may have learned some or all of this already using different terms (or no terms at all). That’s totally fine. My terms are here to act as a convenient handle for the ideas in your mind, so that you can more easily grab onto them and organize them. However it’s the concepts themselves that are most important.
In the next blog we will show you an example of where envisioning the Auto Snapshot makes understanding DAX much easier. Mercifully, it should be a little simpler than this post. Stay tuned!
-BG
Post Script: Estranged Relations
This should also just be filed under “Things that are kind of too advanced for this article but I know I’m going to get emails about”.
One important thing about the Related columns added during the Super Lookup (“Table Expansion”) is that there are lots of places in DAX where those columns get dropped in order to give users behavior they expect.
For example, if I use a querying tool like DAX Studio and write something like:
EVALUATE
VAR MyVariable = Sale
RETURN MyVariable
I’m telling DAX to create a variable called “MyVariable” populate it with the Temp Table from the Auto Snapshot of Sale, then finally bring back the results.
After reading this article you might assume that the table that gets returned to DAX studio will have columns from both Sale and Dish. That’s what the Super Lookup does right?
If you run the query though, only the columns from Sale show up:
“What gives? Where are those extra columns Brian?“
Yep, that the first thing I’d ask too. I will say the Temp Table stored in MyVariable *does* have the related columns from Dish in it. But when packaging up the Temp Temp table for DAX Studio those columns get dropped because the person writing the above DAX query would be confused as to why, when asking for the Sale table ended up with a bunch of other columns from some other table.
This works, because when a DAX query runs, what it returns is a Summary Table, which is different than both Model Tables and Temp Tables. The biggest difference from the other two types is that it is in a format readable by things that aren’t the DAX engine.
When Power BI or Tableau or Excel send a DAX query to the DAX engine, they expect the results in a format they can actually read; I call that format a Summary Table. (You’ll also hear this called “The result of a DAX query”.)
So when the DAX query runs, it produces a Temp Table (with the related columns from Dish) that only the DAX engine knows how to read, it then converts that Temp Table to a Summary Table so that Power BI or Tableau or whoever can read it and draw it as a chart. Part of this packaging up is dropping the related columns.
… (akward silence) …
“That’s a very convenient story Brian.”
Fair enough.
OK, how do I know that the variable “MyVariable” has these Related columns then?
I think the next two articles demonstrate it pretty well.
However, for the more advanced folks:
If I give that Temp Table to CALCULATE to add as a filter in the Filter Context; then ask if there is a filter on all three columns of the Dish table the answer is True:
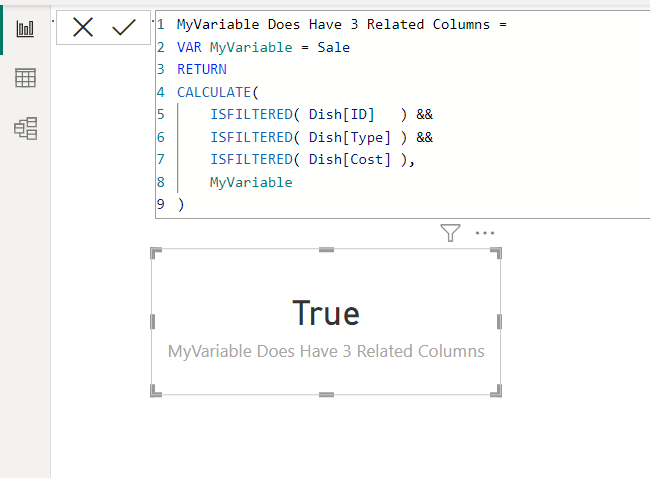
The Temp Table in MyVariable gets added to the Filter Context as a filter (there are no other slicers on the page so it’s the only filter in there). Since the Temp Table in MyVariable has all three Dish columns in it, the filter *also* has those three columns. When I ask if there’s a filter in place on those three columns the answer is True.
If the Temp Table in MyVariable didn’t have those extra related columns the answer would be false.
(Back before the days where Bi-Directional Filtering was a button you could click, you would add Auto Snapshots as filter arguments to CALCULATE to get those kids of results. Lot’s of articles have been written on this, but these days we have a checkbox to handle the problem.)
So the related columns are indeed in there. However if DAX converts a Temp Table to a Summary Table, they get dropped both to decrease confusion and to not bring back an army of columns when only a single table’s worth was requested.
